NEW WORK BY MIKE HEALEY
I have now finished a number of paintings that I have been working on for the last few months - when not publishing three new books!
(What a busy boy I have been!)

These paintings are the first to come out of my tiny studio in Corfu.
More to follow - I hope!

It is not always possible to know exactly where one's work is going when you start out on a series of paintings.

This series appears to focus on women in strange landscapes.
It took several of these works before I realized that I was creating - subconsciously, perhaps - images of the Bacchante (followers of the god of wine, Bacchus)

This is not a new theme for me. The above picture was done several years ago but clearly there is more to say on this subject!

The original Greek name for these women is Maenads, which means - literally - 'frenzied women'.
The female followers of Dionysus would tear male intruders limb from limb if they were found spying on the predominantly female worship of the god.
In the above picture three women are resting after an orgy of destruction. All that remains of their victim is a foot (top right)!

Although traditionally depicted as wild women, the cult of Dionysus was very sophisticated and his followers were often women of status

I have tried not only to capture the glamor and elegance of these women but also the violence within which they operated their rituals - hence the complex settings in which these female figures are set

There are also strong elements of nature for Dionysus was very much associated with growth, the harvest and wild creatures of the forest


I have now finished a number of paintings that I have been working on for the last few months - when not publishing three new books!
(What a busy boy I have been!)

More to follow - I hope!

It is not always possible to know exactly where one's work is going when you start out on a series of paintings.

This series appears to focus on women in strange landscapes.
It took several of these works before I realized that I was creating - subconsciously, perhaps - images of the Bacchante (followers of the god of wine, Bacchus)

This is not a new theme for me. The above picture was done several years ago but clearly there is more to say on this subject!

The original Greek name for these women is Maenads, which means - literally - 'frenzied women'.
The female followers of Dionysus would tear male intruders limb from limb if they were found spying on the predominantly female worship of the god.
In the above picture three women are resting after an orgy of destruction. All that remains of their victim is a foot (top right)!

Although traditionally depicted as wild women, the cult of Dionysus was very sophisticated and his followers were often women of status


There are also strong elements of nature for Dionysus was very much associated with growth, the harvest and wild creatures of the forest

There are also elements representing the the seasons - and moons and stars

Dionysus was also the most violent of all the Greek the gods, even more so than Zeus.
However, in descriptions of the god by poets and other Greek writers, the man himself appears quite Oriental, almost effeminate - something that may reflect his ancient Persian origins.
I have tried to capture some of that in the above image of Dionysus ( a painting I did some years ago)

I have a long way to go on this journey of exploration back into one of the most fascinating (and disturbing) of Greek myths but it is already starting to come together (for me, at least!)

Moreover, I think it is time we escaped from Renaissance images of the Greek gods and returned to their essential pagan origins - as I have tried to do in the above painting of the 'real' Venus!
If you are a gallery owner in any of these places, do please contact me!
The originals are not for sale but if you would like to buy a print, then drop me a line.
They average about £150 ($240 or 185 euros) each, including postage and packaging.
The average size of each print is 30 x 40 cms. but some are slightly larger
mike.healey@hotmail.com
If you would like to learn how these painting were made, then read on.
(This post was first published some months ago)
Work in Progress
After several months away from my studio (to concentrate on my writing) I have started a series of paintings - using decalcomania, a technique I have talked about before on this blog.

Epiphany by Max Ernst
Decalcomania was a printing technique invented in England, in 1756. It was reinvented in 1936 by Surrealist Oscar Dominguez and later used by Max Ernst to stunning effect.
Ernst is a difficult act to follow, so today I will restrict myself to black and white - using bone-black powder mixed with water and applied to a glossy, photographic paper.

Mixing the paste
Mixing the black paste is crucial. It must be thick enough to give density yet wet enough to be maleable. With this technique you need to work fast. The glossy, hard surface paper allows you time to work before absorbing the wet paste.

First application
Apply the wet paste with a broad brush. If you want a thinner section (for a 'sky', for example), simply dip your brush in clean water and reapply to the relevant area.

Paper pressing
This is the fun bit. Take a piece of paper (I use cheap photocopy A4) and press down onto the wet paint. Then, manipulating the paper as you go, pull it slowly back. If you wiggle it at the same time you will create amazing patterns.
This looks easy but in fact takes ages to perfect!
By the way, I am naturally right-handed but I am using my left hand today so that I can operate my camera with my right. No expense spared for this shoot!
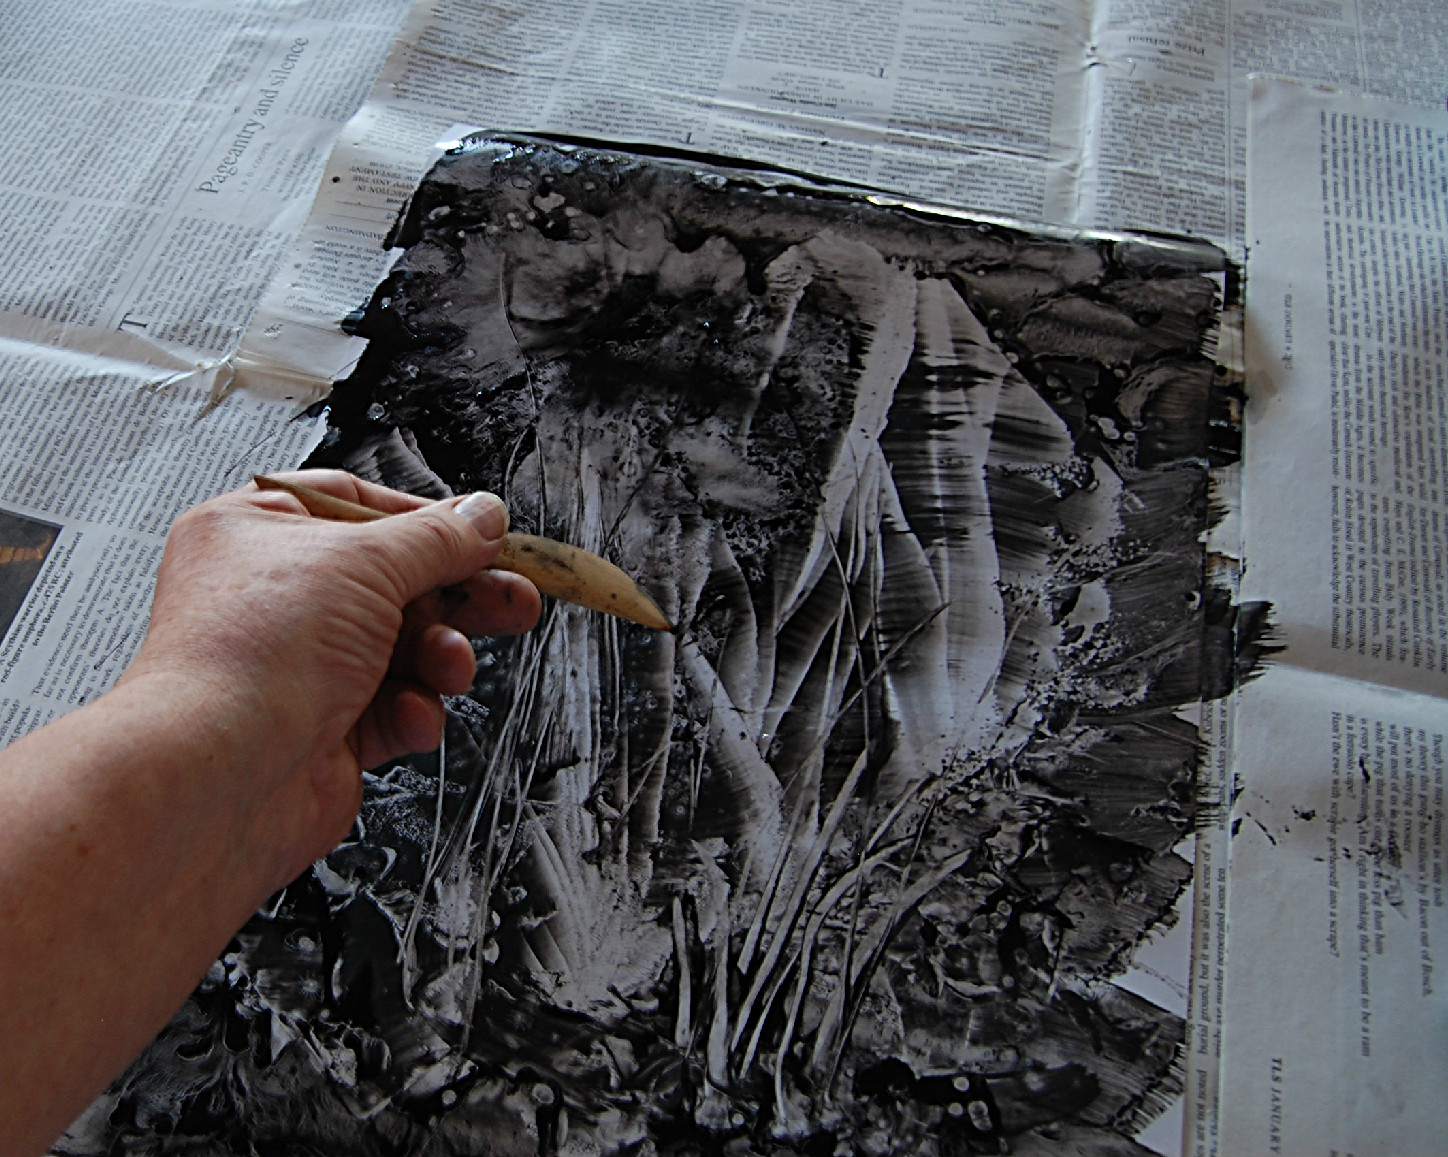
Creating shapes
The next stage is tricky and requires some practice to get right.
While the paint is still wet, use a wooden shape or palette knife to create lines and other marks - here I am creating plant forms. Again, you need to work fast.

Creating curved shapes
Using other shapes you can create a wide range of effects. I have even used kitchen utensils in the past!

Dribbling
You can also hold the sheet up and let the paint dribble. This is a one-off trick over which you have little actual control. Use sparingly!

Adding bleach
From time to time I will add a few spots of household bleach. Hold the bottle (fine nozzle) some distance above the paper for the best spatter effect. Use sparingly!

With bleach added
The results can be quite exciting. Leave paper well alone after application and allow the bleach to separate the granules of powder into fantastic shapes.
The end result should look a little like this one:

Fragment - (unfinished)
The largest glossy photo-paper I can afford in large quantities is A3 so I tend to cut out sections from several sheets and stick them together to make a larger picture - as in the one above which is made of three A3 sheets. You can also cut out smaller details to enrich your picture.
Note the bare feet! Its not that I work naked but it is still warm here in Corfu so I am working in shorts and short-sleeved shirt. Not bad feet for someone in their seventies, eh!?

Canyon - early stage, unfinished
While you can create very complex images using this technique, the danger is that your painting lacks focus.
What I normally do is add some recognizable shape (sun or moon, for example) or element (human figure, say) to give the picture some realistic 'grounding' or visual reference.
I am still working on the picture above but I will show you how it ends up later, on another posting soon.

Final stage - hand painting
The final - and crucially important stage - is to hand paint in details, using a small brush and a thick version of your orginal bone-black paint.
This is partly to mask out imperfections or sections not wanted but also to highlight darker sections and give the image 'depth'.
This is a painstaking task but gives a real 'finish' to your work.

Hamlet by Mike Healey
When you are satisfied with your painting apply a spray varnish. (I use hair spray - its cheaper!). Do not use a brush - it will destroy your work!
This is very important as the dried bone-black is not particularly stable and like charcoal drawings can easily smudge or even flake off. It may take more than one coat to 'fix' your work. Always frame under glass to give that final protection.
In work of this kind I often use collage whereby I cut up one picture and add bits of it to another, thereby gradually building up the overal design
The ideal, however, is to not use collage and end up with a picture that is seemless and complete in itself.
The above is an example of that - apart from the human face that was added last

Above is an example of as complex collage, still unfinished. I have to add a section to cover the bottom left hand frame - as you can see.
The other problem with this large picture (45 x 60 cms) is that it is too fussy in parts - around the sun/eye, for example. This will need simplyfing by painting out sections with a small brush
Although it uses Decalcomania for its basic shapes and textures, there is a great deal of painstakingly slow hand-painting required to give it its final definition and shape
This particular collage is made up of seven separate parts, taken from otherwise abandoned work. The trick however is to know when to stop tinkering - advice I do not always take myself so watch this space!
Mike Healey
The ideal, however, is to not use collage and end up with a picture that is seemless and complete in itself.
The above is an example of that - apart from the human face that was added last

Above is an example of as complex collage, still unfinished. I have to add a section to cover the bottom left hand frame - as you can see.
The other problem with this large picture (45 x 60 cms) is that it is too fussy in parts - around the sun/eye, for example. This will need simplyfing by painting out sections with a small brush
This particular collage is made up of seven separate parts, taken from otherwise abandoned work. The trick however is to know when to stop tinkering - advice I do not always take myself so watch this space!
Mike Healey
Next time I will show you how you can apply this technique using colour poster paints.

Curtain Mountain by Mike Healey
Mike Healey
No comments:
Post a Comment