
I am currently starting a major project (for me, at least!) to create a large, hugely ambitious surreal landscape
I would like to share this process with you over the next few weeks
Professional artists do not, perhaps, usually share this crucial part of their work but for me to go "public", as it were, helps me shape and articulate the process and thereby (perhaps) produce a better painting!
(If you have already read Part 1, then please scroll down to find Part 2)
I have begun the "research" for this painting by trying out some ideas in gouache on paper
This is a technique that I have used many times. What I like about this particular experiment are not only the fluid plant forms but the rich textures of the picture's background. That is something I would like to achieve in the finished work
I have decided that the end painting will be on canvas. My reason for this is that the techniques I want to apply work better on a textured surface rather than on smooth board.
The painting below was done on canvas

This is fine but in closeup you can see how the texture of the canvas shows through the rather thin paint. This is something I will need to be careful of in the larger work

Since my landscape will involve trees and plant forms, I have started looking at photographs. Some of the oldest tree on the planet are not only very stark but also very beautiful:

I also like the idea of including water or perhaps an area of swamp - as in this lovely photograph by Dominique Seytre:

The subtle green light and the sun bursting through are very difficult to capture in paint. Indeed, I have tried this effect before on canvas - with mixed results:

The image above is a detail from a much larger picture painted three years ago and subsequently abandoned. I felt that I had lost focus in a sea of misty, green Impressionism
What I am looking for, I think, is something more disturbing and elemental:

One of my recent experiments on paper - the preliminary sketch shown above - has some of the qualities I am striving for
The plant forms are plant-like yet strange and somewhat disturbing
The lurid yellow sky is very dramatic and works well with the brown foliage. This contrast is worth attempting in the finished landscape
I am also very interested in root forms, bony fingers that plunge into the earth - as in this photograph below:

What I would like to do is to combine roots and water or swamp, as in this photograph below:

I have managed to capture some of these colours in one of my preliminary 'experiments':

What my sketch lacks are the strong shapes and dark contrasts of the photograph, particularly at the base of the tree and the subtle yellow and orange-brown highlights. These issues will need to be addressed in the finished work
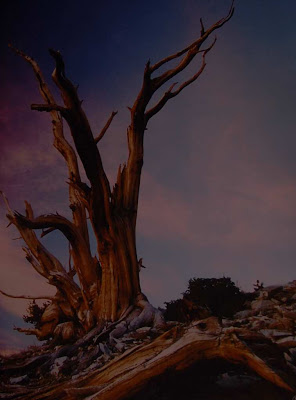
Skies are also very important. We know from the trouble artists like John Constable took over skies that they need to be both dramatic and credible
The sky in the above photograph is very delicate, tinged as it is with pink - a stunning contrast with the stark outline of the dead tree that dominates the foreground
Much to learn from here!

Some skies, however, are extremely dramatic
What works well in the above photograph is the contrast between the thin strip of light blue and the dark, ominous clouds above
That is a device I might use in my finished painting - perhaps!

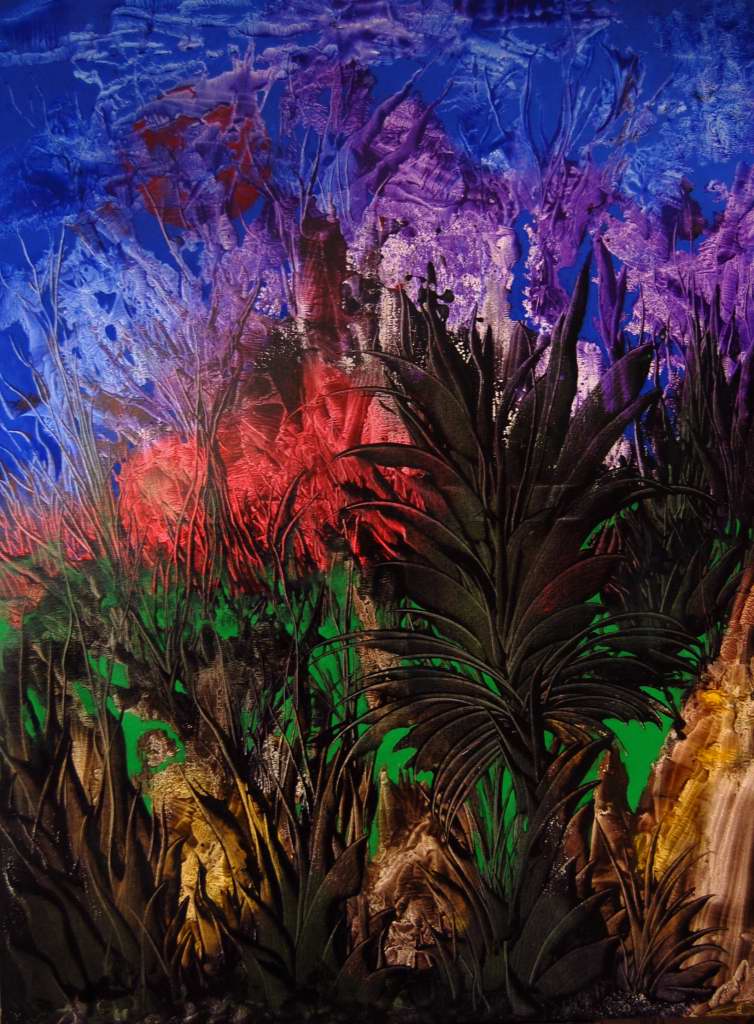
The most successful of my preliminary "experiments" (shown above) manages - more by luck than design, perhaps - to combine rock and plant forms against a dramatic sky
The only problem is that it lacks spatial depth - something that I really do need to address in the much larger finished work
So, back to the drawing board!

I will let you know how I get on - perhaps!


The beautiful colour photographs used to illustrate the above article are taken from Arbres et Forets du Monde by Dominique Seytre and published by Editions GEO (2008)

Editions GEO
PART 1
Research and Development
(If you have already read Part 1, then please scroll down to find Part 2)
I have begun the "research" for this painting by trying out some ideas in gouache on paper

This is a technique that I have used many times. What I like about this particular experiment are not only the fluid plant forms but the rich textures of the picture's background. That is something I would like to achieve in the finished work
I have decided that the end painting will be on canvas. My reason for this is that the techniques I want to apply work better on a textured surface rather than on smooth board.
The painting below was done on canvas

This is fine but in closeup you can see how the texture of the canvas shows through the rather thin paint. This is something I will need to be careful of in the larger work

Since my landscape will involve trees and plant forms, I have started looking at photographs. Some of the oldest tree on the planet are not only very stark but also very beautiful:

I also like the idea of including water or perhaps an area of swamp - as in this lovely photograph by Dominique Seytre:

The subtle green light and the sun bursting through are very difficult to capture in paint. Indeed, I have tried this effect before on canvas - with mixed results:

The image above is a detail from a much larger picture painted three years ago and subsequently abandoned. I felt that I had lost focus in a sea of misty, green Impressionism
What I am looking for, I think, is something more disturbing and elemental:

One of my recent experiments on paper - the preliminary sketch shown above - has some of the qualities I am striving for
The plant forms are plant-like yet strange and somewhat disturbing
The lurid yellow sky is very dramatic and works well with the brown foliage. This contrast is worth attempting in the finished landscape
I am also very interested in root forms, bony fingers that plunge into the earth - as in this photograph below:

What I would like to do is to combine roots and water or swamp, as in this photograph below:

I have managed to capture some of these colours in one of my preliminary 'experiments':

What my sketch lacks are the strong shapes and dark contrasts of the photograph, particularly at the base of the tree and the subtle yellow and orange-brown highlights. These issues will need to be addressed in the finished work

Skies are also very important. We know from the trouble artists like John Constable took over skies that they need to be both dramatic and credible
The sky in the above photograph is very delicate, tinged as it is with pink - a stunning contrast with the stark outline of the dead tree that dominates the foreground
Much to learn from here!

Some skies, however, are extremely dramatic
What works well in the above photograph is the contrast between the thin strip of light blue and the dark, ominous clouds above
That is a device I might use in my finished painting - perhaps!

The most successful of my preliminary "experiments" (shown above) manages - more by luck than design, perhaps - to combine rock and plant forms against a dramatic sky
The only problem is that it lacks spatial depth - something that I really do need to address in the much larger finished work
So, back to the drawing board!

I will let you know how I get on - perhaps!
Part 2
Development and ApplicationIt may be December but here in Montlaur (Corbieres, France) its a bright sunny morning and I am out with my camera

These are my neighbour's cats. Cute, eh?!

OK, so I should be working in my studio! What I have managed to do, however, is some work on the TOP half of my proposed landscape

In other words, what you see here is only HALF of the finished work! In fact, it is only a preliminary sketch - I have yet to start work on the large canvas itself

The technique used here in this preliminary "sketch" (above) is Decalcomania - a device invented in 1935 by Oscar Dominguez but later developed by Max Ernst
It involves applying paint to a smooth surface onto which you immediately press paper. As you peel off this paper and manipulate it carefully you can create remarkable shapes and patterns
The "sketch" below began with this process - to provide a textured background. The plant forms were then added by the rapid manipulation of a palette knife on the still wet paint - gouache in this case
The "sketch" below began with this process - to provide a textured background. The plant forms were then added by the rapid manipulation of a palette knife on the still wet paint - gouache in this case
The net result - if it works - can be both rich and complex!

The next stage is to give depth to these plant forms by adding black shadows. Imagine that light is coming from one side (in this case, from the left) so that you then darken the right side of each stalk or leaf
This not only gives "depth" but rounds each stalk. Its painstaking work but worth the effort!

I also experimented this time with gold paint, to which I added varnish and a second darker colour. I am very pleased with this effect (above) and will use it more extensively in the finished work

In its initial form, this experimental canvas was somewhat confused. However, by adding sky I was able to give it more shape and content - as below:

The difference is quite striking. The sky itself at this stage is only blocked in (painstakingly!) and lacking surface detail but it does define the plants forms more clearly
I particularly like the "flying" stalks on the top left of this picture. What I do need to do, however, is make more sense of the middle section and remove the rather ugly black, horizontal line that has somehow crept in!
This will require a lot of detailed painting by hand
In Part 1 you may remember I wanted to include some kind of swamp area - based partly on this wonderful photograph by Dominique Seytre:

Something like this will occupy the lower part of the large, finished canvas but I have begun that process in this top half by adding a thin layer of green to create a water effect at the base of the red plants' roots

When varnished the green will shine, revealing the red "roots" of the waterside plants more clearly
So, a great deal still to do and this is only the TOP half of my proposed landscape
Best get on!

I will let you know soon what happens next
Part 3
GroundworkI have up to now been working on the TOP half of my landscape and have probably done as much as I can with my first tryout on canvas
This is how it looks now:

It is probably not good enough to stand as a painting in its own right (even with the Ernst-like red sun!) but I have learned a great deal from this exercise

The red and green plant stalks work well and I will try and recreate some of those in the finished landscape

Likewise, the gold rocks and dark, slate-blue "trees" in the bottom right of my preliminary canvas
The gold was more an accident than planned but I will certainly use it in the finished work, perhaps as part of the sunlight filtering through dense canopy
So, now for the lower part of this ambitious landscape!
This morning was another sunny day in Montlaur so I took my camera and headed for the limestone gorge between my village and Camplong

I am now thinking hard about the lower half of my landscape - a mixture of rocks, lake and large tree roots plunging into the swamp!
The gorge has given me some ideas

Texture is everything and while I am not interested in copying nature I do need my imaginary rocks to have some credibility or reference in reality
Here is an experiment in gouache on paper that I completed about an hour ago

I like the jagged tree growing out of the rock - that is something I will try in the finished work

The sky this morning was very blue and cloudless. What I want, however, is something far more dramatic - as in this other experiment made this afternoon:

The background is perhaps a little too busy but has some of the detail I want in the finished work
The thin plant forms reaching up into this sky are quite effective - again something I will try and replicated in the finished work

The above sketch is another attempt to create tree forms against rock.
What I will do when this particular sketch is dry is add sky or water between the rooks - to give it depth and context
So, ever on!
Back now to the drawing table!

I have now reached that stage where I need to take stock on my research and development and reflect on where I am going with this large landscape
The thin plant forms reaching up into this sky are quite effective - again something I will try and replicated in the finished work

The above sketch is another attempt to create tree forms against rock.
What I will do when this particular sketch is dry is add sky or water between the rooks - to give it depth and context
So, ever on!
Back now to the drawing table!

Part 4
Time for ReflectionI have now reached that stage where I need to take stock on my research and development and reflect on where I am going with this large landscape
This is a difficult stage and one which I sometimes shirk - to my cost!
It is also something which few artists are actually prepared to share with outsiders, not least because you are at your most vulnerable as an artist and because, well, it takes away some of the mystery of our work
There is no mystery!
Painting is a mixture of close observation, practice and concentrated application
(Plus some luck!)

What is clear thus far is that while aspiring towards photographic realism (as in the photograph above) my art is actually far more impressionistic - as in this earlier study (below) for rock formations - something I really saw one foggy morning in the Montaigne Noir

What happened with this particular gouache is that I allowed the painting process to define the final image, thus moving away from what my eyes actually saw that morning towards something
perhaps more transient and subtle
This rather neatly defines my methodology, whereby nature is a starting point and not necessarily an end in itself
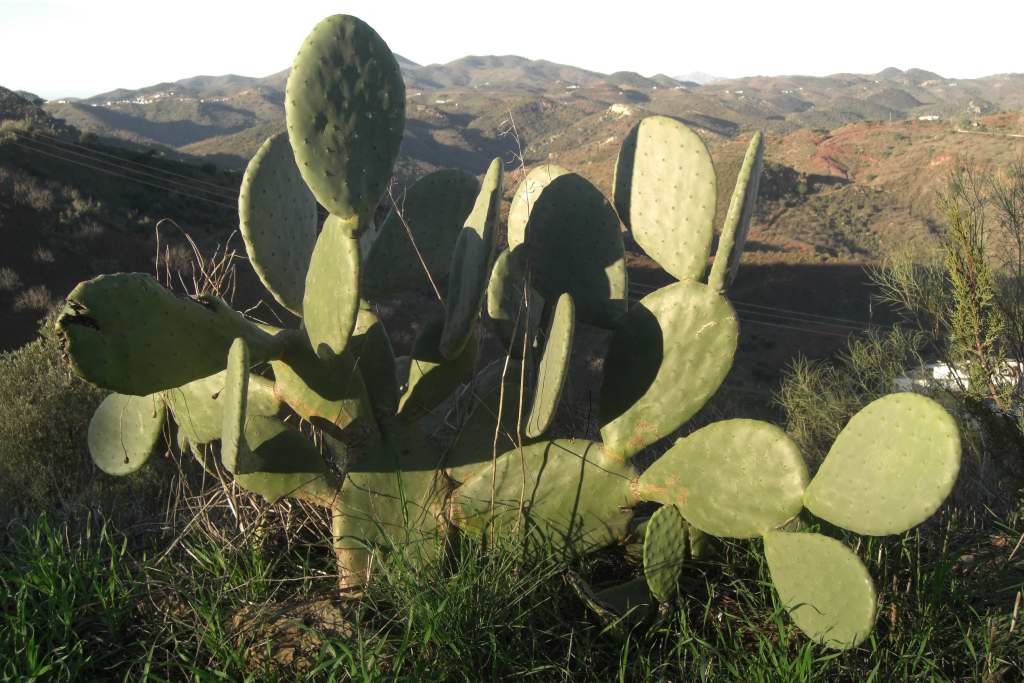
Here (below) is a photograph I took of a large cactus plant in Spain:

And here is what it turned into - a study of a man-eating cactus in charcoal!

My point is that nature may be the starting point but the creative act transforms reality (the photograph) into (hopefully) something unique
The challenge therefore with this large landscape project is to make an effective transition from the images in my head (often based on photographic reserch) to something unique on canvas
This end result may be impressionistic but to give it credibility it still needs to have some grounding in reality - in this case, observed natural forms

This little gouache also raises another important issue for me - spatial depth
We know from the work of Cezanne, Matisse and later Braque and Picasso that perspective can be usurped or distorted, whereby a picture can sustain several vanishing points or spatial planes
That's not the problem!
The problem for me is to create an impressionistic landscape but at the same time the illusion that it extends beyond the front plane and deeper into the canvas, as it were

The large painting of mine is called The Garden of Eden
I am very fond of this work but I still worry about its lack of spatial depth - the dense foliage seems still too shallow although the snake does give it some depth of field
This problem is clearly something I have to solve in the large landscape I am about to paint

The study (for the top half of my finished landscape) shown above goes some way to address this problem but much will depend on whether or not I can make this strip of foliage and sky appear behind the larger tree forms that will occupy the lower half of the canvas

Actual techniques used can help this process - as in the above work in which I have created several layers of (dribbled) paint
The problem is that this technique is somewaht inflexible for what I now have in mind

In this graphite drawing of an oasis seen in North Africa I have managed to get some spatial depth, largely by creating a false horizon (the thin strip of white "sky") and by increasing the amount of foreground rocks
These (amongst many others!) are devices that I need to keep in mind when working on the large canvas that even as I write sits in my studio, staring at me threateningly!
So, watch this space and I will not only tell you but show you how I get on over the next few days when I start to actually paint this (for me, at least!) ambitious project.

Mike Healey
PART 5
I have now finished this large project
Before I show you the completed work, please allow me to show you some of the steps taken towards its final state

This is a detail from the top right-hand corner of this large canvas
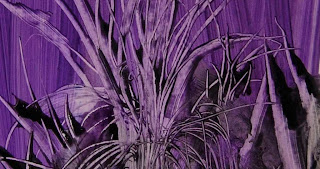
I mentioned in an earlier post how I had experimented with purple. Well, here the purple plant is contrasted with an intense blue sky - an effect that I think works well

I expressed concern earlier in this article on the need to not only make the sky more interesting but to achieve spatial depth overall
This detail from the top left-hand corner of the finished work show my partial success in that regard

The first stage - using very wet gouache - was done with the canvas on the floor. Only when that was completed, dried and partially varnished did I put it back on the easel for the final detailed hand painting
This final stage took most of the time (several days of concentrated work), the initial stage having been completed in less than an hour!

One interesting aspect of the original colour application was that in some places, when the paint was too thin or watery, spots of white canvas showed through.
This I quite liked and kept in several places - as the above detail shows

The green of the "swamp" was added last by over painting the ground with plain green paint
Since this photograph was taken I have darkened the water and blended it
better into the surrounding foliage
So, time to show you the finished work I guess!

I hope you like it!
If you have any comments on this posting (or indeed any other part of my blog) please do not hesitate to drop me a line
Your comments (or queries) will always be welcome
Mike Healey

What is clear thus far is that while aspiring towards photographic realism (as in the photograph above) my art is actually far more impressionistic - as in this earlier study (below) for rock formations - something I really saw one foggy morning in the Montaigne Noir

What happened with this particular gouache is that I allowed the painting process to define the final image, thus moving away from what my eyes actually saw that morning towards something
perhaps more transient and subtle
This rather neatly defines my methodology, whereby nature is a starting point and not necessarily an end in itself
Here (below) is a photograph I took of a large cactus plant in Spain:
And here is what it turned into - a study of a man-eating cactus in charcoal!

My point is that nature may be the starting point but the creative act transforms reality (the photograph) into (hopefully) something unique
The challenge therefore with this large landscape project is to make an effective transition from the images in my head (often based on photographic reserch) to something unique on canvas
This end result may be impressionistic but to give it credibility it still needs to have some grounding in reality - in this case, observed natural forms

This little gouache also raises another important issue for me - spatial depth
We know from the work of Cezanne, Matisse and later Braque and Picasso that perspective can be usurped or distorted, whereby a picture can sustain several vanishing points or spatial planes
That's not the problem!
The problem for me is to create an impressionistic landscape but at the same time the illusion that it extends beyond the front plane and deeper into the canvas, as it were

The large painting of mine is called The Garden of Eden
I am very fond of this work but I still worry about its lack of spatial depth - the dense foliage seems still too shallow although the snake does give it some depth of field
This problem is clearly something I have to solve in the large landscape I am about to paint

The study (for the top half of my finished landscape) shown above goes some way to address this problem but much will depend on whether or not I can make this strip of foliage and sky appear behind the larger tree forms that will occupy the lower half of the canvas

Actual techniques used can help this process - as in the above work in which I have created several layers of (dribbled) paint
The problem is that this technique is somewaht inflexible for what I now have in mind

In this graphite drawing of an oasis seen in North Africa I have managed to get some spatial depth, largely by creating a false horizon (the thin strip of white "sky") and by increasing the amount of foreground rocks
These (amongst many others!) are devices that I need to keep in mind when working on the large canvas that even as I write sits in my studio, staring at me threateningly!
So, watch this space and I will not only tell you but show you how I get on over the next few days when I start to actually paint this (for me, at least!) ambitious project.

Mike Healey
PART 5
I have now finished this large project
Before I show you the completed work, please allow me to show you some of the steps taken towards its final state

This is a detail from the top right-hand corner of this large canvas
I mentioned in an earlier post how I had experimented with purple. Well, here the purple plant is contrasted with an intense blue sky - an effect that I think works well

I expressed concern earlier in this article on the need to not only make the sky more interesting but to achieve spatial depth overall
This detail from the top left-hand corner of the finished work show my partial success in that regard

The first stage - using very wet gouache - was done with the canvas on the floor. Only when that was completed, dried and partially varnished did I put it back on the easel for the final detailed hand painting
This final stage took most of the time (several days of concentrated work), the initial stage having been completed in less than an hour!

One interesting aspect of the original colour application was that in some places, when the paint was too thin or watery, spots of white canvas showed through.
This I quite liked and kept in several places - as the above detail shows

The green of the "swamp" was added last by over painting the ground with plain green paint
Since this photograph was taken I have darkened the water and blended it
better into the surrounding foliage
So, time to show you the finished work I guess!
I hope you like it!
If you have any comments on this posting (or indeed any other part of my blog) please do not hesitate to drop me a line
Your comments (or queries) will always be welcome
Mike Healey
FOOTNOTE
The beautiful colour photographs used to illustrate the above article are taken from Arbres et Forets du Monde by Dominique Seytre and published by Editions GEO (2008)

Editions GEO
No comments:
Post a Comment